Imagine a dinner roll so soft it practically melts in your mouth, infused with the fragrant aroma of fresh rosemary and finished with a golden, garlicky, buttery glaze. These aren't just any side dish; these are your new go-to soft & fluffy rosemary dinner rolls, elevated to irresistible status with a generous brush of savory garlic butter and a sprinkle of flaky sea salt. Perfect for enhancing any meal, from a casual weeknight dinner to a festive holiday spread, these rolls promise comfort, elegance, and an unforgettable flavor experience.
Making homemade bread can often feel daunting, but this recipe for rosemary dinner rolls is surprisingly straightforward. While it does involve some hands-off rising time, the active prep work is minimal, yielding a result that tastes like it came straight from a gourmet bakery. Get ready to fill your kitchen with the most enticing aromas and delight your family and friends with these spectacular garlic butter rosemary dinner rolls!
Why These Rosemary Dinner Rolls Belong on Your Table
There are countless reasons to fall in love with these aromatic rolls, but here are the key highlights that make them an absolute must-try:
- Effortlessly Elegant: These aren't your average dinner rolls. The addition of fresh rosemary and a gleaming garlic butter finish instantly elevates any meal, making them perfect for special occasions like holiday gatherings, yet the recipe is simple enough for a regular Sunday dinner. They bring a touch of sophistication without demanding hours of your time.
- A Symphony of Aromas: From the moment the yeast activates to the final golden-brown bake, your kitchen will be filled with the most incredible scent. The earthy, piney notes of fresh rosemary mingle beautifully with the pungent, sweet aroma of garlic butter, creating an olfactory experience that’s almost as satisfying as the first bite. It’s the kind of smell that signals comfort and promises deliciousness.
- Incredibly Versatile Pairing: Wondering what to serve these delightful Grandma's aromatic rosemary rolls with? The answer is almost anything! Their robust yet balanced flavor profile makes them an excellent companion to hearty stews, classic roast chicken, creamy lasagna, comforting meatloaf, or even a simple bowl of soup. They truly enhance a wide array of main dishes.
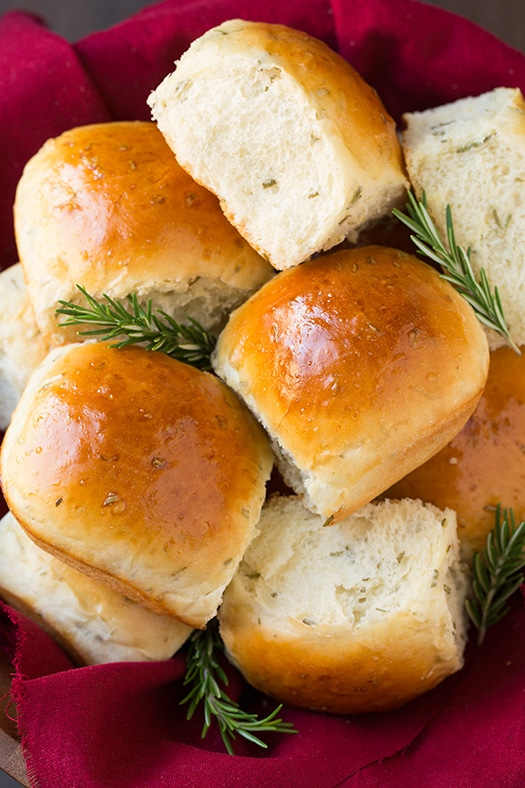
- Unparalleled Softness and Flavor: Prepare for a truly delightful texture. These rolls are exceptionally soft and fluffy on the inside, with a tender crumb that practically melts in your mouth. Each bite delivers a burst of fresh rosemary, complemented by the rich, savory notes of butter and garlic. The hint of sweetness from the dough and the finishing touch of flaky sea salt create a perfectly balanced flavor profile that will leave everyone reaching for more.
- A Taste of Nostalgia: For many, homemade bread, especially one infused with such comforting flavors, evokes cherished memories of family meals and warmth. These rosemary dinner rolls have that power to transport you back to simpler times, making them not just food, but an edible hug from the past.
The Magic Behind the Flavor: Key Ingredients
The beauty of these garlic butter rosemary dinner rolls lies in a handful of simple, high-quality ingredients working in harmony. Each component plays a crucial role in achieving that perfect texture and unforgettable flavor:
- Active Dry Yeast: This tiny microorganism is the heart of any good bread. It's responsible for the glorious rise, transforming a dense dough into light, airy rolls. You'll activate it in warm milk with a touch of sugar, watching for that tell-tale foam that signifies it's alive and ready to work its magic.
- Warm Milk: The ideal temperature is key here – think bathwater warm, around 100-110°F (38-43°C). Too hot, and you'll kill the yeast; too cold, and it won't activate properly. Milk not only hydrates the yeast but also contributes to a richer flavor and a softer crumb than water alone.
- Granulated Sugar: Beyond feeding the yeast, sugar also lends a subtle sweetness to the rolls and helps achieve that beautiful golden-brown crust.
- Large Eggs: Eggs are crucial for structure, binding the dough, and contributing to the fluffy, airy texture. They also enrich the dough, making it more tender and flavorful. Ensure they are at room temperature for seamless integration into the dough.
- Unsalted Butter: Generous amounts of butter are used both in the dough for richness, moisture, and extreme softness, and, of course, for the star of the show: the garlic butter topping. Using unsalted butter allows you to control the overall saltiness of the rolls. Remember to soften it for the dough to ensure easy mixing.
- Fresh Rosemary: This is non-negotiable for true rosemary dinner rolls. Dried rosemary simply can't compare to the vibrant, pungent, and slightly piney flavor of fresh. Finely chop it to ensure its aromatic essence is distributed throughout every bite.
- Salt: Essential for balancing flavors and regulating yeast activity. It also strengthens the gluten network, contributing to the dough's structure.
- All-Purpose Flour: The foundation of our rolls, providing the necessary structure and elasticity. While bread flour can also be used for a chewier texture, all-purpose flour yields beautifully soft and tender results.
- Minced Garlic & Fresh Parsley: These are the dynamic duo for our irresistible garlic butter topping. Freshly minced garlic provides that robust, savory kick, while fresh parsley adds a touch of color and a mild, herbaceous freshness.
- Flaky Sea Salt: The perfect finishing touch! Sprinkled over the garlic butter, it adds a delightful textural crunch and a burst of savory flavor that beautifully contrasts with the soft roll.
Crafting Your Perfect Rosemary Dinner Rolls: A Step-by-Step Guide
While homemade bread might seem like a project, these rosemary dinner rolls are surprisingly forgiving, with much of the time being hands-off. Here's how to create these delectable treats:
- Activate the Yeast: In the bowl of a stand mixer fitted with a dough hook, combine your warm milk, active dry yeast, and one tablespoon of granulated sugar. Give it a gentle whisk and let it sit undisturbed for 5-10 minutes. You're looking for a foamy, frothy layer on top, which indicates your yeast is active and ready to make magic. If it doesn't foam, your yeast might be expired or the milk temperature was off, and it's best to start again.
- Mix the Dough: To the foamy yeast mixture, add the remaining granulated sugar, room-temperature eggs, softened unsalted butter, finely chopped fresh rosemary, salt, and half of the all-purpose flour. Mix on low speed until just combined. Gradually add the remaining flour, a little at a time, until a shaggy dough forms. Increase the speed to low-medium and knead for 7-10 minutes. The dough should become smooth, elastic, and pull away from the sides of the bowl. It will be slightly sticky but shouldn't adhere to your fingers excessively.
- First Proof (Rise): Lightly flour a clean surface and turn the dough out. Knead it a few times by hand to form a smooth ball. Lightly oil a large bowl, place the dough inside, and turn it once to coat. Cover the bowl tightly with plastic wrap or a clean kitchen towel. Let it rise in a warm, draft-free place until it has doubled in size, typically 1 to 1.5 hours, depending on your kitchen's temperature. This crucial step allows the yeast to produce gases, creating the airy texture.
- Shape the Rolls: Once doubled, gently punch down the dough to release the air. Turn it out onto a lightly floured surface and gently roll it into a log. Using a sharp knife or a bench scraper, divide the log into 12 equal portions. For consistent sizing, you can weigh each portion (aim for about 60-70 grams per roll). Take each portion and roll it into a tight, smooth ball. The goal is to create surface tension, which helps the rolls hold their shape and rise beautifully.
- Second Proof & Bake: Arrange the shaped rolls in a greased 9x13 inch baking pan, leaving a little space between each. Cover the pan again with plastic wrap or a towel and let them rise for another 30-45 minutes, or until noticeably puffy and nearly doubled in size. While the rolls are proofing, preheat your oven to 375°F (190°C). Bake the rolls for 18-22 minutes, or until they are golden brown on top and sound hollow when tapped.
- The Irresistible Garlic Butter Finish: While the rolls are baking, prepare your garlic butter. Melt unsalted butter and stir in freshly minced garlic and chopped fresh parsley. As soon as the rolls come out of the oven, generously brush the warm garlic butter over the tops. The hot rolls will absorb the butter beautifully, infusing them with incredible flavor. Finish with a sprinkle of flaky sea salt for an extra pop of seasoning and texture.
Tips for Success & Delightful Variations
To ensure your rosemary dinner rolls are nothing short of spectacular every time, consider these helpful tips and creative twists:
- Room Temperature Ingredients: Always ensure your eggs and butter are at room temperature. This helps them incorporate smoothly into the dough, leading to a more homogenous mixture and a finer crumb.
- Don't Rush the Proofing: Patience is a virtue in bread making! The rise times are estimates; rely on visual cues (doubled in size, puffy) rather than strict timing. A slower, cooler rise can sometimes even develop more flavor.
- The Importance of Kneading: Don't skimp on the kneading time. This develops the gluten, which is essential for the soft, elastic texture of the rolls. A well-kneaded dough will pass the "windowpane test" – you should be able to stretch a small piece of dough thin enough to see light through it without tearing.
- Make-Ahead Magic: You can prepare the dough the night before! After the first rise, punch down the dough, shape the rolls, and arrange them in the baking pan. Cover tightly with plastic wrap and refrigerate overnight. The next morning, let them come to room temperature and proof for about 1-1.5 hours before baking.
- Freezing for Future Feasts:
- Baked Rolls: Allow fully baked and cooled rolls to freeze in an airtight container or freezer bag for up to 3 months. Reheat gently in the oven or microwave.
- Unbaked Rolls: After shaping the rolls (before the second proof), place them on a baking sheet and freeze until solid. Transfer to a freezer bag. When ready to bake, place frozen rolls in a greased pan, cover, and let them thaw and proof at room temperature for 3-5 hours (or overnight in the fridge) before baking as directed.
- Herb Variations: While rosemary is divine, feel free to experiment! Thyme, sage, or a blend of Italian herbs could also make wonderful additions to the dough, offering a different aromatic profile.
- Garlic Butter Enhancements: Kick your garlic butter up a notch by adding a pinch of red pepper flakes for subtle heat, a sprinkle of grated Parmesan cheese, or even a squeeze of fresh lemon juice for brightness.
- Serving Suggestions: Beyond the main course, these rolls are fantastic for making mini sandwiches, serving alongside a robust charcuterie board, or simply enjoyed on their own with extra butter.
These Easy Rosemary Dinner Rolls with Irresistible Garlic Butter Flavor are more than just a recipe; they're an experience waiting to unfold in your kitchen. From the satisfying process of working with yeast dough to the incredible aromas that fill your home, and finally, to the pure delight of that first warm, garlicky, rosemary-infused bite, every step is rewarding. Whether you're aiming to impress guests, bring comfort to a family meal, or simply treat yourself to a culinary indulgence, these rolls are guaranteed to be a showstopper. So, roll up your sleeves, gather your ingredients, and prepare to bake some joy. Your taste buds (and your family) will thank you!
